
.png)


D.I.Y Maleficent Costume
- Vasuhi
- Nov 7, 2015
- 3 min read
Hey peeps! so i know Halloween’s now come to an end, however i couldn’t go without sharing my costume this year – Maleficent (...meets mild grunge).
To be honest this was an emergency outfit, so I was a bit doubtful with how this would turn out. However saying that, I’m super happy with the outcome (and it was under £10!...happy days!)
So if you’re a fan yourself why not give it a go!

For this project you will need:
Black headband
PVA glue
4 sheets of A4 card paper
Sellotape
2 small plastic or polystyrene cups
4-5 sheets of kitchen roll
Black paint
A2 black card paper
Small polystyrene foam ball
Green tissue paper
Black tissue paper
Scissors
Push pins
Instructions
This project is split into two parts: Maleficent’s horns and her stick.
HORNS
1. Stencil horizontal strips (approx. 4-5cm in width) on your A4 card.

2. Cut these strips out.

3. Starting from the top of your polystyrene cup, sellotape each individual strip around the cup to form the bottom your horns.

4. Repeat the above process, forming the top of Maleficent’s horns. Make sure you sellotape each strip to secure in place. I actually felt the horns were quite long when making them, so i cut off 3 cms from the bottom of the horns.

5. Repeat steps 3 and 4 when creating the second horn.

6. Cut up your sheets of kitchen tissue into small squares.

7. Using a brush and some PVA glue, stick your strips of tissue around the horns and leave to dry for around 20 minutes.

8. Using sellotape, secure the horns onto your headband. As you can see below, I went crazy with the tape!

9. Then using the strips of kitchen tissue that you cut earlier, PVA glue this around the tape, so that it will be easier to paint on top of. Leave to dry for around 15-20 minutes.

10. Once dry, paint the horns using black acrylic paint and leave to dry for 40 minutes.

STICK
1. To create the green ball of Maleficent’s stick, get your polystyrene foam ball and cover this in green tissue paper. Make sure you twist a tail shape at the bottom of the ball.

2. Using your push pins, pin this in place. I went for green push pins to go with the theme of my costume. If you don’t feel the pins are secure enough you can always sellotape this in place.

3. Roll up your A2 black card (forming a large wand shape). You can achieve this look by twisting the rolled up card. Sellotape this securely in place.

4. Cut 2cm slits down the top of your want shape stick and fold back to form a cross symbol.

5. Cut the flaps of your stick forming triangle shapes.

6. Fold black tissue paper and cut 3 or 4 tear drop shapes (starting from the folded end). I cut 4 however needed to use only 3 in the end. Once cut, unfold this so that the ends of your cut outs are symmetrical.

7. Fold back the tear drop shaped tissue paper and slot this into your wand. Sellotape this to the flaps of your wand.
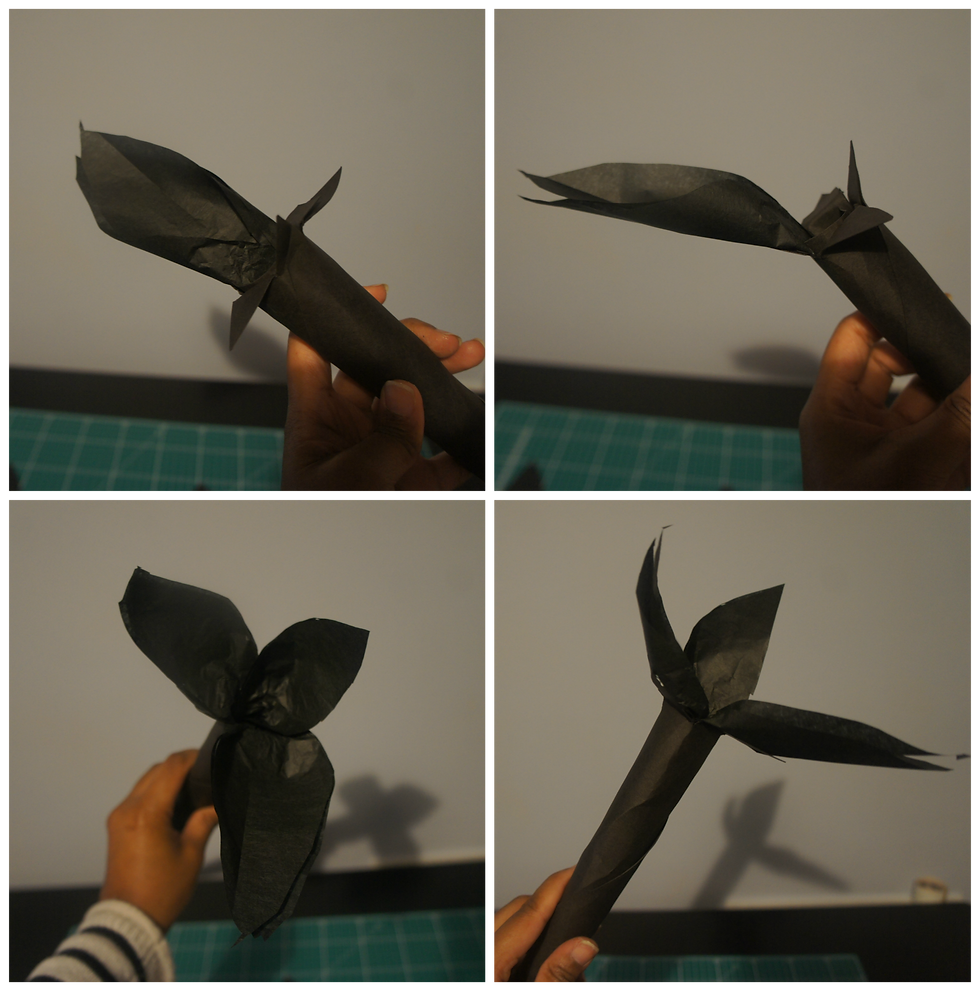
8. Using the tail shape of your green ball, slot this inside your wand shaped stick. Using push pins, pin this in place. Although the pins added to the look of the stick, i felt this wasn’t secure enough so I also sellotaped this in place.


Finally i completed this look with a black dress and a black feather necklace.


Comments